How to Moisture Test Hardwood and Subfloor for Hardwood Installation

It is important to know and understand how to apply the necessary steps to test the subfloor and wood flooring for moisture prior to installation.
Photo: INSTALL.
The moisture parameters for hardwoods and subfloors that are required for successful hardwood floor installations depend on several factors, including the type of hardwood, the subfloor material, the acceptable moisture difference between the two, and the environmental conditions at the installation site. Before jumping into the specific steps for moisture testing, it helps to start with the moisture guidelines we follow at INSTALL for each of these important factors.
Type of hardwood: For engineered hardwood, moisture content should be between 6% and 9%, and it should be acclimated to the installation environment prior to installation, typically in the range of three to seven days. For solid hardwood, moisture content should be between 6% and 10%. Solid hardwood also generally requires a longer acclimation period, often seven to 14 days, depending on the wood species and conditions.
Subfloor material: For plywood and Oriented Strand Board (OSB) subfloors, moisture content should generally be between 6% and 12%, and the subfloor should be flat with deviations typically no greater than 3/16-inch over a 10-foot span.
Acceptable moisture difference between the hardwood and the subfloor: Generally, the moisture content of the hardwood flooring should be within two to four percentage points of the subfloor moisture content. To minimize the risk of issues like cupping, warping or gaps, it’s best to stick to a maximum difference of 4% between the two measures. For example, if the solid hardwood is 6% and the plywood subfloor is 10%, that would be the maximum acceptable difference.
Environmental conditions: Ideally, the relative humidity of the installation environment should consistently be between 30% and 50% to minimize moisture content fluctuations in the flooring materials. Humidity extremes can be detrimental, leading to expansion or contraction of the wood and potentially causing damage over time.
Once you’ve identified your hardwood, subfloor, and installation environment and you understand the guidelines, you can proceed with moisture testing. Make sure you’re using a reliable moisture meter that is designed for wood and subfloor materials, and consult the manufacturer’s instructions before using the meter for the first time.
Taking Moisture Measurements
Hardwood flooring installers have a number of available moisture meter brand and style options, each with its own look and features. The following steps are intended as a general guide and may differ slightly depending on your particular moisture meter.
Step One: Identify the type of meter and/or mode you’ll be using. Some meters offer two modes. A pin meter or “Pin Mode” measures moisture with pins. A pinless meter or “Scan Mode” is for non-destructive surface scanning.
Step Two: Pin Meter/Pin Mode (Deep Scan) A pin meter or “Pin Mode” works by measuring the electrical resistance across an opposing set of pins that are pushed into the wood. Most pin-type meter manufacturers recommend placing the pins parallel with the direction of the grain of the wood. Once inserted, electrical current is forced through the wood between the pins. Because wood is a poor conductor of electricity and water is a good conductor of electricity, wood with higher moisture content has a lower resistance. Hold the meter steady to allow the meter to stabilize and provide the reading displayed as a percentage.
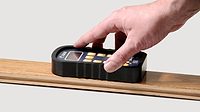
Step Two: Scan Meter/Scan Mode (Surface Scan) A scan meter or “Scan Mode” is also referred to as non-invasive and non-destructive because it does not leave any small holes in the flooring like pin-type meters do. Instead, a pad emits electromagnetic waves to measure the moisture without penetrating the wood. Signal penetration for these types of meters can be up to 1 inch, and the meter can be moved across the surface relatively unaffected by temperature or roughness. Measurements can be taken through coatings, varnishes or paints without damage to the surface. If using this type of meter on engineered flooring comprising multiple species (i.e., wear layer, core and backing), check with the meter manufacturer for testing protocol, accuracy and appropriate species correction values. To take a moisture content measurement, place the sensor pad against the surface of the hardwood flooring or subfloor material. Slowly move the pad across the area you want to measure, ensuring good contact for an accurate reading. Read the moisture content displayed as a percentage.
Step Three: Record the readings for each material, hardwood and subfloor, and compare the readings following the acceptable parameters to determine if further action is needed to adjust moisture levels.
Determining moisture content is an easy and essential part of quality control during a hardwood floor installation. Equipped with a dependable moisture meter and an understanding of best practices, installers can proceed with the confidence that they have moisture under control.
Looking for a reprint of this article?
From high-res PDFs to custom plaques, order your copy today!


